CodeSmith Project Manage Outputs
Manage Outputs
Managing your CodeSmith Project is simple to do, and best of all, you don't have to be in CodeSmith to do it. That's why we've exposed the ability to manage your project from just about anywhere, Windows Explorer, CodeSmith Studio and Visual Studio. Meaning whatever interface you're seeing the project file, you can edit, change outputs, Add Outputs, change properties, or even Merge Regions. Code Generation has never been easier.
Manage Outputs from Visual Studio
To manage a CodeSmith Project, you can use the Right-Click context menu of a CodeSmith Project file from the Solution Explorer window.(Depicted on the right)
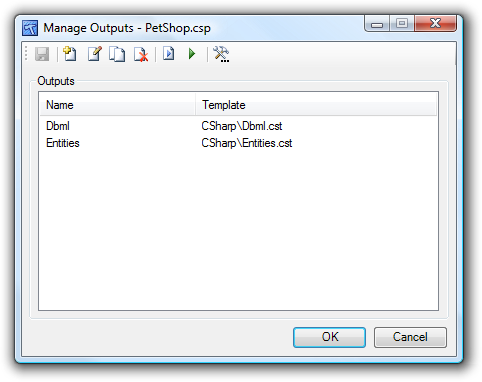
Once you choose Manage Outputs, a dialog box will appear with the current Outputs that you have configured in your CodeSmith Project.
Configuring your Options
There are several options you have the ability to configure, initially, you need to add at least one Output.
Outputs Window | Are the current configured Outputs for your CodeSmith Project. If an output does not specify a CodeSmith template to use, the Output will use the Default Template. (depicted above) |
Add Button | Opens the Add Output Form so that you can add a new output with an existing template or use the default template. |
Edit Button | Opens the Edit Output Form which you can edit the output options or template properties. |
Copy Button | Creates a copy of a selected output. This is especially useful if you are creating many outputs that use the same template, but use a single different piece of meta-data to differentiate from. You would then only have to change the one property for all of the copied outputs. |
Delete Button | Deletes an Output from your CodeSmith Project. |
Generate Selected Button | Generates the output for the selected template. |
Generate Button | Begins the generation process for this CodeSmith Project. This is the same as selecting Generate Output. |
Project Options Button | Opens the Project Options dialog. |
OK Button | Persists all modifications that were made on the form. |
Cancel Button | Cancels any changes from the form and closes the window. |
Add/Edit Outputs
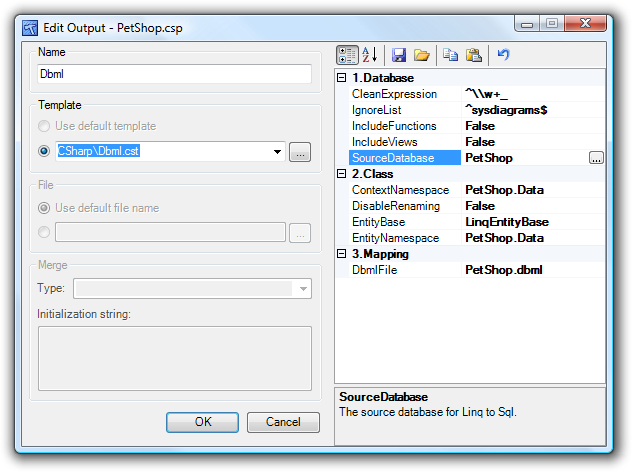
Selecting the ability to add or edit an Output, you are able to configure the all aspects of an Output. To open the Edit Output dialog, you can click on the edit icon in the Manage Outputs toolbar or double click on an output listed in the Outputs list.
There are four panels that cover all of the options for configuring an Output. Below is the entire Add/Edit Output Form.
Choose a Template
If a Template has been configured from in the Main Manage Outputs screen, then you will see the template name listed under the Use Default Template option. Otherwise, you will have a File Chooser control to select your template that you want the output to be generated from.
Choose an Output
Choosing an output requires you to name the Output file you are wanting to use. The default Output name is created by the template you are using.
NOTE: If you have a template that does not have an output, this field will be ignored.
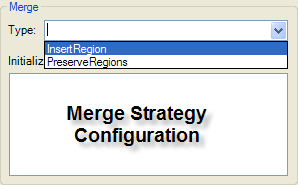
Optional: Choose a Merge Strategy
If your template uses a merge strategy, either InsertRegion or PreserveRegions, you would enter the pattern here.
Configuring the Property Sheet
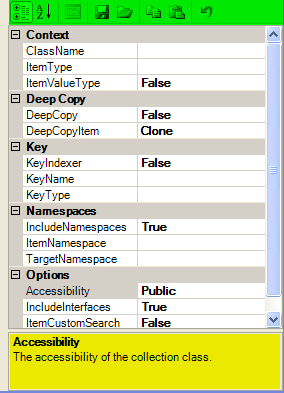
The right pane is a familiar property of the template you have chosen. You would fill in the necessary values for your template to run. The top shaded green area shows the property sheet options.
NOTE: Any Required fields missing will throw an error when you attempt to save the Output changes.

.png?version=1&modificationDate=1301002034020&cacheVersion=1&api=v2)


