...
Getting started with CSLA is an easy three step process.
Step 1: Download CodeSmith Generator
Download and install the latest version of CodeSmith Generator.
| Widget Connector | ||
|---|---|---|
|
You can get up and running with our CSLA Templates in a matter of seconds. The steps below will guide you through this process.
| Info |
|---|
The CSLA templates require the latest version of CodeSmith Generator. |
| Info |
If you haven't already downloaded and installed CodeSmith Generator, please do so before continuing. If you have not previously registered with CodeSmith Tools or do not currently own a license of CodeSmith Generator, you will be required to register on the CodeSmith Tools website to get a trial key before using CodeSmith Generator. |
Step 2: Find the CLSA Templates
- Open Template Explorer
- Navigate to Frameworks\CSLA in the Generator Samples folder.
Step 3: Run the QuickStart
| Widget Connector | ||
|---|---|---|
|
...
Open the QuickStart
You will first need to open Template Explorer to display a list of templates that you can execute. Once opened, you will need to expand the CodeSmith Generator Samples\Frameworks\CSLA folder (by double clicking on each closed folder).
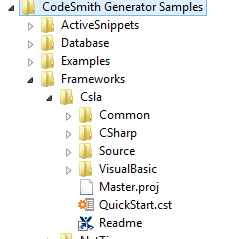
Finally, double click the QuickStart.cst template or right click QuickStart.cst and select Execute.
Run the QuickStart
Now it's time to configure the QuickStart's template properties. You can start this process by choosing a SourceDatabase. Once you have configured the QuickStart, click on the Generate button.
By default, clicking generate will automatically open Visual Studio so that you can quickly get started using CSLA!
...
. Once this happens, you will need to build the Visual Studio solution in order to start the generation process!