Using a Generator Project inside Visual Studio
- Autumn Wilkins (Unlicensed)
- Cody Smith (Unlicensed)
- Anonymous
The tight integration with Visual Studio allows you to fully manage any CodeSmith Generator Project right from Visual Studio! This means you can maintain a high Code Generation presence right within Visual Studio and not have to switch applications to run code generation.
Creating a new CodeSmith Generator Project
To add a new CodeSmith Generator Project file to your Visual Studio Project, right click on a Project or folder inside of a project inside of Solution Explorer. Then choose File > New Item from the context menu. This will open the Visual Studio New File Wizard. Next, you will want to select CodeSmith Generator under the General Installed Templates node. Doing this will only show you the available CodeSmith Generator Item Templates.

Finally, select Generator Project and then select the Open button or double click on Generator Project.
Managing a CodeSmith Generator Project From Visual Studio
To manage a CodeSmith Generator Project, you can use the Right-Click context menu of a CodeSmith Generator Project file from the Solution Explorer tool window.

The Output Options sub menu include:

- Manage Outputs - Gives the ability to manage your CodeSmith Generator Project.
- Generate Outputs - Will kick off the generation process to produce outputs configured in your CodeSmith Generator Project.
- Add Outputs
- Output Options - Only available in Visual Studio, and allows you to control the output options after generation.
- Add Outputs To Project - Will take any outputs from your CodeSmith Generator Project and include them in your Visual Studio project.
- Hide Outputs - Will take any outputs of your CodeSmith Generator Project and make them child nodes, dependant on your CodeSmith Generator Project file (shown in the image below). Hidden nodes can be collapsed, and since much of the time generated code shoudln't be touched, it's a great way to hide the temptation of other developers attempting to modify the generated code.
- Generate On Build - A menu driven way to have your templates use Active Generation. You can also specify the BuildAction value in the property sheet of your CodeSmith Generator Project (see the Active Generation section for more information).
You can remove the CodeSmith Generator Visual Studio Project dependencies by turning off Generate On Build.

Active Generation
You can use ActiveGeneration quite easily in your Visual Studio projects now, simply by specifying the BuildAction of your CodeSmith Generator Project.
Setting the BuildAction = "Generate" in the properties of you CodeSmith Generator Project file in the Solution Explorer will cause your entire generation process to occur prior to your project building. This means that any Outputs that you have in your CodeSmith Generator Project will be generated and if you want, included in the Visual Studio project.

Example
We have a BusinessObject.csp CodeSmith Generator Project in our class library Visual Studio project. This CSP has 4 outputs, that generate from the same BusinessObject.cst CodeSmith Generator template.
- Order.cs
- Product.cs
- Profile.cs
- Supplier.cs
Looking into the properties of the CodeSmith Generator Project, you can view the Build Action of the file, and there is an option to set it to Generate on Build. Meaning every time you need to tweak your Database meta-data, XML Property meta-data, or CodeSmith Generator template, the changes are picked up in your Visual Studio project the very next time you build.
This enables you to alleviate much of the frequent developer problems with making changes across all of your classes, during the development process.
Output Window Generation Feedback
As you can see depicted in the image below, the business object was generated, and then the build process began. This is a very powerful feature since it allows you to have strong Code Generation integration inside all of your projects in Visual Studio without having to switch to Template Explorer.

Adding Files to Visual Studio Using DependentUpon Hierarchy
A new overload to the templates RenderToFile that will take a parent (DependentUpon) file. This will add metadata to the output file that Visual Studio will use when adding the file to create the hierarchy.

To get your template to support this, you'll need to update the template to use the RenderToFile overload that takes a parent file. Next, add the CodeSmith Generator Project to the Visual Studio project and Generate Outputs. CodeSmith Generator will automatically add the outputs to your Visual Studio project creating the hierarchy.
Sample Template Code
//Create Sub template using the Create method to automaticly wire everything up
EntityGeneratedClass entityClass = this.Create<EntityGeneratedClass>();
EntityEditableClass partialClass = this.Create<EntityEditableClass>();

string className = type.Name;

string parentFileName = className + ".cs";
parentFileName = Path.Combine(OutputDirectory, parentFileName);
//Output parent file
partialClass.RenderToFile(parentFileName, false);

string fileName = className + ".Generated.cs";
fileName = Path.Combine(OutputDirectory, fileName);
//Output child (dependent) file linking to parent
entityClass.RenderToFile(fileName, parentFileName, true);
Adding Files to Visual Studio with a specific Build Action
When generating files to a Visual Studio Project, you may want to set the Build Action of a generated file to a specific value. For example, when generating an EDMX file, you always want to set the Build Action to EntityDeploy.
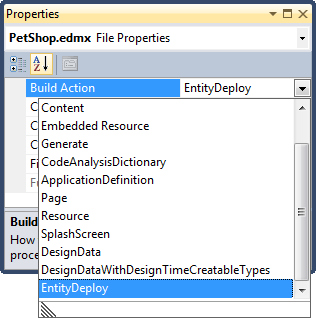
One can accomplish this by updating your template. First you must create an instance of OutputFile and pass it the file path of the item being generated. Next, you need to add the BuildAction to the MetaData dictionary.
OutputFile output = new OutputFile("PetShop.edmx");
output.Metadata.Add("BuildAction", "EntityDeploy");
this.RegisterOutput(output);
Now you have two options to ensure that the BuildAction is set correctly.
- If your template is a sub template and it generates the physical content that the build action should be set on, then you would need to just call the CodeTemplate's RegisterOutput method as shown above.
- If you are calling RenderToFile on a template, then you would need to use a RenderToFile overload that takes an OutputFile. Please see the API documentation for more information.