Configuring and troubleshooting a Schema Provider
- Anonymous
- Autumn Wilkins (Unlicensed)
The sections below will help guide you through using and configuring various Schema Providers that ship with CodeSmith Generator.
Creating a new connection string
The Data Source window will check to see if a schema provider supports showing Connection String designer. If it doesn't, then you must manually enter a valid connection string into the Connection String text box. You must enter in a valid connection string for the Provider Type you are trying to use.
- If you're using the SqlSchemaProvider, connection strings follow the format used by the .NET SqlConnection.ConnectionString property.
- If you're using the ADOXSchemaProvider, connection strings follow the format used by the ADO ConnectionString property.
- If you're using the OracleSchemaProvider, please be sure to check out the link below for creating a connection string as well as the Connecting to an Oracle database section below.
- If you're using the PostgreSchemaProvider, please make sure the following statement is included in your ConnectionString: Preload Reader = true;
For all SchemaProviders, please be sure to use the proper ConnectionString for the Database Provider you are using. A great resource for building database ConnectionStrings can be found here.
Configuring a Schema Providers behavior
A schema provider may contain additional configurable logic that changes how the schema provider behaves. For example, you may only want to show the various schema objects for the current logged in user or allow CommandResultSchema information to be retrieved.
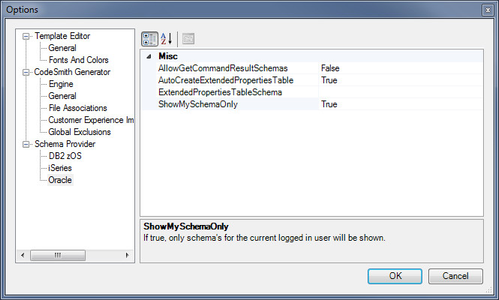
These settings can be configured in the Generator Options Schema Provider section as shown above.
Oracle Schema Provider
Connecting to an Oracle database
The first step is to add a new Data Source. Once the Data Source window is open, you will want to select the OracleSchemaProvider from the Provider Type drop down menu.
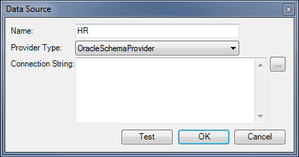
Next, you will want to click on the ellipse button (...) to build the connection string.
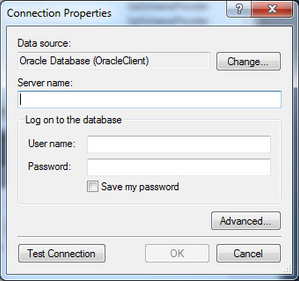
After you have filled out all of the required information, press the Test Connection Button or the OK button. If you could connect to your Oracle Server, then you are all done. If this doesn't work you may be scratching your head and thinking you are out of luck. The good news is your not. You will need to use a modified connection string that the Connection Properties UI doesn't account for.
"This is another type of Oracle connection string that doesn't rely on you to have a DSN for the connection. You create a connection string based on the format used in the tnsnames.ora file without the need to actually have one of these files on the client pc" (http://www.connectionstrings.com/oracle).
You will need to manually configure this connection string using the initial Data Source User Interface's Connection String text box (shown above). Below is an example of using an TNS-Less (Transparent Network Substrate) connection string.
Data Source=(DESCRIPTION=(ADDRESS_LIST=(ADDRESS=(PROTOCOL=TCP)(HOST=MyHost)(PORT=MyPort)))(CONNECT_DATA=(SERVER=DEDICATED)(SERVICE_NAME=MyOracleSID)));User Id=myUsername;Password=myPassword;
Please see the following website for more information on Oracle Connection Strings.
Installing Oracle Data Access Components (ODAC)
CodeSmith Generator is compiled as AnyCPU. This means that Generator will run as a 64bit process when you launch Generator outside of Visual Studio. If you are generating from within Visual Studio (32bit process), then CodeSmith Generator libraries will run as a 32bit process.
This is very important to understand as it determines which Schema Provider dependencies are resolved at run-time.
If you are trying to use the Oracle Schema Provider you may be presented with an error message that states a BadImageFormatException was thrown. This can be resolved by installing the ODAC libraries.
If you are running a 64bit version of windows, please install both the 32bit and 64bit versions.
Please visit the Oracle .NET Developer Center and download and install the latest versions of ODAC (32-bit, 64-bit). It is recommended that you restart your computer after installing the ODAC libraries.
MySQL Schema Provider
If you are trying to use the MySQL Schema Provider you may encounter the error message: 'The MySQL.Data.MySQLClient is not installed on this computer'. This error can occur because the MySQL Connector/Net ( MySql.Data.MySqlClient DbProvider) hasn't been installed on your machine.
Installing MySQL Connector/Net
Please download and install the latest MySQL .NET connector which can be found here. It is recommended that you restart your computer after installing the MySQL .NET connector.
Version 6.7.4 of the MySQL connector may not work in some circumstances. If you run into an issue where the connector isn't being resolved. It is recommended that you try installing an older version of the client.
Configuring MySQL Connector/Net
The MySQL Schema Provider doesn't require a specific version of the MySQL managed libraries. This is because it uses DbProviderFactories when interacting with MySQL. One must update all .NET Framework 4.0 machine.config's and add the MySQL provider to the DbProviderFactories element:
<system.data>
  <DbProviderFactories>
    <add name="MySQL Data Provider" invariant="MySql.Data.MySqlClient" description=".Net Framework Data Provider for MySQL" type="MySql.Data.MySqlClient.MySqlClientFactory, MySql.Data, Version=6.7.4.0, Culture=neutral, PublicKeyToken=c5687fc88969c44d" />
  </DbProviderFactories>
</system.data>
Please ensure that you update the Version number (E.G., Version=6.7.4.0) with the version of the MySQL Connector/NET that you installed.
The .NET Framework 4.0 machine.config's can be found here:
- %windir%\Microsoft.NET\Framework\v4.0.30319\Config\machine.config
- %windir%\Microsoft.NET\Framework64\v4.0.30319\Config\machine.config
SQLite Schema Provider
If you are trying to use the SQLite Schema Provider you may encounter the error message: 'The System.Data.SQLite library is not installed on this computer'. This error can occur for two reasons:
- The System.Data.SQLite hasn't been installed on your machine.
- The System.Data.SQLite hasn't been properly configured.
Installing System.Data.SQLite
CodeSmith Generator is compiled as AnyCPU. This means that Generator will run as a 64bit process when you launch Generator outside of Visual Studio. If you are generating from within Visual Studio (32bit process), then CodeSmith Generator libraries will run as a 32bit process.
This is very important to understand as it determines which Schema Provider dependencies are resolved at run-time.
The first step is to ensure that you download and install the latest .NET Framework 4.0 version of System.Data.SQLite.
Configuring System.Data.SQLite
The SQLite Schema Provider doesn't require a specific version of the SQLite managed libraries. This is because it uses DbProviderFactories when interacting with SQLite. One must update all .NET Framework 4.0 machine.config's and add the SQLite provider to the DbProviderFactories element:
<system.data>
  <DbProviderFactories>
    <add name="SQLite Data Provider" invariant="System.Data.SQLite" description=".Net Framework Data Provider for SQLite" type="System.Data.SQLite.SQLiteFactory, System.Data.SQLite" />
  </DbProviderFactories>
</system.data>
The .NET Framework 4.0 machine.config's can be found here:
- %windir%\Microsoft.NET\Framework\v4.0.30319\Config\machine.config
- %windir%\Microsoft.NET\Framework64\v4.0.30319\Config\machine.config
You should copy the 64bit SQLite assemblies if you are using 64 bit windows.
Finally, you are ready to start using the SQLite Schema Provider!
PostgreSQL Schema Provider
Connecting to an PostgreSQL database
Please follow the steps outlined in the "Creating a new connection string" section for information on creating a new data source.
Please make sure the following statement is included in your ConnectionString: Preload Reader = true; Also you can limit what schema objects are returned by adding a SearchPath to your connection string.
Installing Npgsql
If you are trying to use the PostgreSQL Schema Provider you may be presented with an error message that states a FileNotFound was thrown. This can be resolved by installing the Npgsql libraries.
System.IO.FileNotFoundException: Could not load file or assembly 'Npgsql, Version=2.0.11.0, Culture=neutral, PublicKeyToken=5d8b90d52f46fda7' or one of its dependencies. The system cannot find the file specified.
The error message is telling us that we need to install version 2.0.11.0 of Npgsql. We then navigate to the Npgsql downloads section and look for this version. You will need to download the .NET 4.0 compiled version (E.G., ending with bin-ms.net4.0.zip). After this has been done, unblock the zip and extract the files to a folder. Next run GacUtil from an elevated Visual Studio command prompt and gac the two extracted assemblies as shown below.
gacutil -i Npgsql.dll
gacutil -i Mono.Security.dll